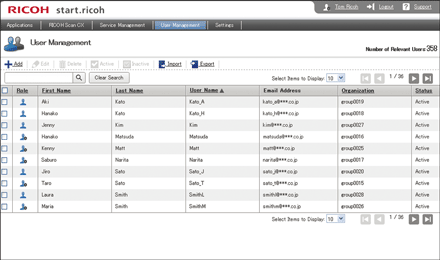
A list of registered users is displayed.

Item |
Description |
|---|---|
Add |
Adds a user. |
Edit |
Edits the properties of a user that has been selected using a checkmark in the list. |
Delete |
Deletes users that have been selected using a checkmark in the list. |
Active |
Enables users that have been selected using a checkmark in the list. Enabled users can log in to start.ricoh. |
Inactive |
Disables users that have been selected using a checkmark in the list. Disabled users cannot log in to start.ricoh. |
Import |
Imports user information from a CSV file. Up to 10,000 entries can be imported at once. |
Export |
Exports user information displayed in the list to a CSV file. |
Search box |
Searches registered users by entering their last name, first name, user name, e-mail address, or organization. |
Clear Search |
Clears the displayed search results and returns to the list of users. |
Select Items to Display |
Selects the number of users displayed in the list. |
Role |
Displays the user's roles: [Tenant Administrator] or [User]. Click to switch between alphabetical order and reverse alphabetical order. For details, see Role and Authority. |
Last Name |
Displays the user's last name. Click to switch between alphabetical order and reverse alphabetical order. |
First Name |
Displays the user's first name. Click to switch between alphabetical order and reverse alphabetical order. |
User Name |
Displays the user name. Click to switch between alphabetical order and reverse alphabetical order. |
Email Address |
Displays the user's main e-mail address. |
Organization |
Displays the user's organization names. If multiple organization names are registered, they are separated by spaces. Click to switch between alphabetical order and reverse alphabetical order. |
Status |
Click to switch between alphabetical order and reverse alphabetical order. |
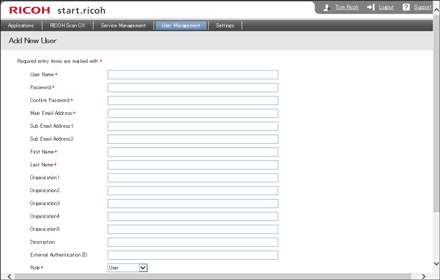
Add New User screen

Item |
Description |
|---|---|
User Name |
Specify a user name using up to 128 characters. Allowed characters are single-byte characters, "-", ".", and "_". ("-" cannot be entered at the beginning.) |
Password |
Specify the password to log in to start.ricoh. Allowed characters are single-byte ASCII alphanumeric characters and symbols. 6 to 128 characters may be specified. You may not use "\" or "`". |
Confirm Password |
Enter the password again for confirmation. |
Main Email Address |
Specify the destination for notification e-mail messages. Allowed characters are single-byte alphanumeric characters and symbols that conform to the ASCII-code standard. |
Sub Email Address1–2 |
Specify the destination for notification e-mail messages. Allowed characters are single-byte characters and symbols that conform to the ASCII-code standard. |
First Name |
Specify the user's first name using up to 128 characters. Only spaces are not permitted. |
Last Name |
Specify the user's last name using up to 128 characters. Only spaces are not permitted. |
Organization1–5 |
Specify organizations. You can enter up to 64 characters. Only spaces are not permitted. |
Description |
Specify any additional information using up to 128 characters. |
External Authentication ID |
Specify the login user ID for card authentication, using up to 128 characters. This can also be registered by logging into RICOH Scan CX Embedded while establishing a connection using card authentication. For information about how to log in using Card Authentication Package V2, see Card Authentication Package V2 User's Guide. |
Reply Email Language |
Select the language to send notification e-mail messages. |
Time Zone |
Select the time zone. |
Role |
Select [Tenant Administrator] or [User] as the user's roles. [Tenant Administrator] can specify administrator authority and user authority to access each service. |
Service Access Settings |
Specify administrator authority and user authority for making access to each service. For details, see Role and Authority. |
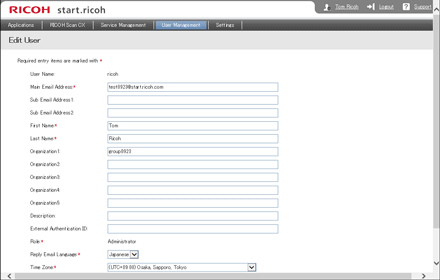
Edit User screen

Item |
Description |
|---|---|
User Name |
Displays the user's name. |
Main Email Address |
Specify the destination for notification e-mail messages. Allowed characters are single-byte characters and symbols that conform to the ASCII-code standard. |
Sub Email Address1–2 |
Specify the destination for notification e-mail messages. Allowed characters are single-byte characters and symbols that conform to the ASCII-code standard. |
First Name |
Specify the user's first name using up to 128 characters. Only spaces are not permitted. |
Last Name |
Specify the user's last name using up to 128 characters. Only spaces are not permitted. |
Organization1–5 |
Specify the user's organization. You can enter from 1 to 64 characters. Only spaces are not permitted. |
Description |
Specify any additional information using up to 128 characters. |
External Authentication ID |
Specify the login user ID for card authentication, using up to 128 characters. This can also be registered by logging into RICOH Scan CX Embedded while establishing a connection using card authentication. For information about how to log in using Card Authentication Package V2, see Card Authentication Package V2 User’s Guide. |
Reply Email Language |
Select the language to send notification e-mail messages. |
Time Zone |
Select the time zone. |
Role |
Displays the user's roles: [Tenant Administrator] or [User]. [Tenant Administrator] can specify administrator authority and user authority to access each service. For details, see Role and Authority. |
Service Access Settings |
Displays the authority for the service being used. |
Registering a user
![]() Log in to start.ricoh, and then click [User Management].
Log in to start.ricoh, and then click [User Management].
![]() Click [Add].
Click [Add].
![]() Enter the user's information, and then click [OK].
Enter the user's information, and then click [OK].
To register more users, click [OK/Add Next]. When a user is registered, a notification e-mail is sent to all the specified e-mail addresses.
Editing a user's information
![]() Log in to start.ricoh, and then click [User Management].
Log in to start.ricoh, and then click [User Management].
![]() Select the checkbox of the user whose information you want to change, and then click [Edit].
Select the checkbox of the user whose information you want to change, and then click [Edit].
![]() Enter the user's information, and then click [OK].
Enter the user's information, and then click [OK].
Deleting a user's information
![]() Log in to start.ricoh, and then click [User Management].
Log in to start.ricoh, and then click [User Management].
![]() Select the checkbox of the user you want to delete, and then click [Delete].
Select the checkbox of the user you want to delete, and then click [Delete].
![]() Click [OK].
Click [OK].
Enabling/disabling a user
![]() Log in to start.ricoh, and then click [User Management].
Log in to start.ricoh, and then click [User Management].
![]() Select the checkbox of the user whose status you want to switch, and then click [Active] or [Inactive].
Select the checkbox of the user whose status you want to switch, and then click [Active] or [Inactive].
![]() Click [OK].
Click [OK].
Importing user information
![]() Log in to start.ricoh, and then click [User Management].
Log in to start.ricoh, and then click [User Management].
![]() Click [Import].
Click [Import].
![]() Specify the import settings, and then click [OK].
Specify the import settings, and then click [OK].
![]() On the confirmation window, click [OK].
On the confirmation window, click [OK].
Exporting user information
![]() Log in to start.ricoh, and then click [User Management].
Log in to start.ricoh, and then click [User Management].
![]() Click [Export].
Click [Export].
![]() Click [Download].
Click [Download].

