
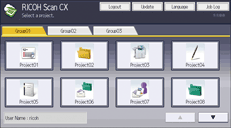
The save destination and scan settings can be configured and saved as a project. The created project is displayed as the project button on the machine's operating screen.
To specify a storage service as the location for storing documents, register it in the service coordination settings in the User Information menu in advance.
Project registration/changing screen
This screen displays a list of projects that are assigned to a group. Projects can be created and edited on this screen. Projects can be created and edited on this screen.
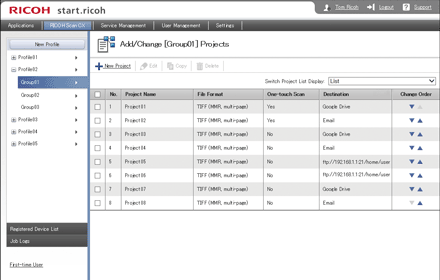
Item |
Contents |
|---|---|
New Project |
Displays the editing screen for a new project. |
Edit |
You can edit the checked project. |
Copy |
You can copy the checked project. |
Delete |
You can delete the checked project. |
Switch Project List Display |
You can switch the display format of the project list.
|
No. |
Displays the project display order. |
Project Name |
Displays the name set for a project. |
File Format |
Displays the file type used for saving data when it is scanned. |
One-touch Scan |
Indicates whether or not one-touch scan is used. |
Destination |
Displays the destination of documents when they are scanned. |
Change Order |
The project display order can be changed by clicking |

![]()
It takes up to an hour to apply the specified settings to the machine. To apply the settings immediately, carry out one of the following:
Execute [Update] in [Profile Management] in Administration Tool.
In the project selection menu on the machine's control panel, press [Update].
Reboot the machine.
General tab
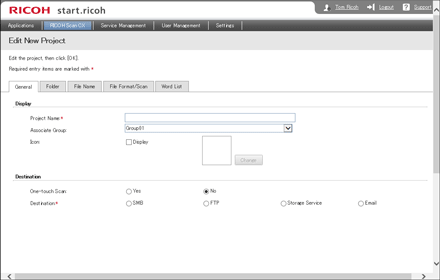
Item |
Contents |
|---|---|
Project Name |
Set a project name using up to 128 characters. A project name consisting of only single-byte or double-byte spaces cannot be used. |
Associate Group |
Set the group that the project belongs to. |
Icon |
Specify whether or not to display the icon of a project. If [Display] is selected, click [Change] and select an icon from the screen that appears. Only icons registered to RICOH Scan CX can be selected. Graphics on the local PC cannot be selected. |
One-touch Scan |
Specify whether or not to perform One-touch Scanning.
|
Destination(network storage) |
Set the destination for delivering the scanned documents.
If you have selected SMB or FTP to store the scan file An authentication dialog box appears when you select a new project on the machine. Once an authentication by password is successful, the authentication dialog box does not appear again unless authentication/connection fails. |
Destination(storage service) |
Set the destination for delivering the scanned documents.
When Specifying Microsoft SharePoint Online (Microsoft Office 365) as the Storage Service Specify [Sending Site's URL] according to the following procedure:
The following websites are supported:
The website must contain a folder or library. The following libraries are supported:
|
Destination(e-mail) |
Set the destination for delivering the scanned documents.
|
Password Restrictions |
Specify whether or not to perform password authentication for the project. If password authentication is enabled, the authentication dialog box appears when you select a project on the machine. |
Error Notification |
Specify whether or not to send an e-mail notification when an error occurs. |
Notify to |
If [Yes] is selected in [Error Notification], the destination of the sent e-mail is specified. If [Send to Login User] is selected, an error notification e-mail is sent to the address set by the login user. [Send To Me] can be selected for Authentication Mode. |
Folder tab
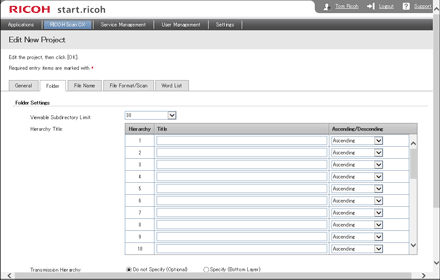
Item |
Contents |
|---|---|
Viewable Subdirectory Limit |
Set the number of displayed layer titles. 1 to 30 titles can be displayed. |
Hierarchy Title |
Set to display an optional message for each folder layer. |
Ascending /Descending |
Set the display order. |
Transmission Hierarchy |
Set the folder layer for saving documents. Select [Do not Specify (Optional)] to set an optional folder layer on the machine. Also, select [Specify (Bottom Layer)] to set the bottom layer. |
Save Last Used Directory |
Specify whether to save the folder information that was selected at the machine and whether to display it the next time you use a project. |
File Name tab
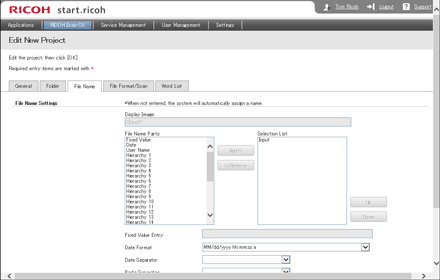
Item |
Contents |
|---|---|
Display Image |
Displays the file naming image. |
File Name Parts |
Shows a list of elements that can be used to construct the file name. File names can be set to documents according to the set items, such as [Fixed Value] and [Date], etc. If Input is set, the file name can be changed on the machine. |
Fixed Value Entry |
If [Fixed Value] is selected in [File Name Parts], the file name is specified using up to 80 characters. The entry cannot consist of only single-byte spaces. The following characters cannot be used: \ / : * ? " < > | |
Date Format |
Set the Date Type. |
Date Separator |
Sets the character used to separate elements in a date (month, day, year) when a date is selected as an element for the file name. |
Parts Separator |
Sets the character that separates the different elements used in the file name. |
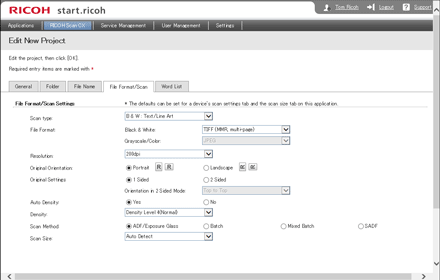
File Format/Scan tab
Item |
Contents |
|---|---|
Scan type |
Set the Scan type. |
File Format |
Set the File Format.
Word or Excel can be selected only when RICOH Scan CX standard is used. |
Resolution |
Set the Resolution. |
Original Orientation |
When using the ADF, select the document orientation. |
Original Settings |
Select the type of the original. When the ADF is used, this setting ensures accurate image capture and later viewing of the scanned file. If [2 Sided] is selected, you must specify [Top to Top] or [Top to Bottom] from the adjacent dropdown list. [Top to Top] means that text reads like pages in a book. [Top to Bottom] means that text reads like pages bound at the top. If [1 Sided] has been selected, the setting to specify the page-turning direction is unavailable (grayed out). |
Auto Density |
Set the Auto Density. Selecting [Yes] adjusts scanning density to improve resolutions for paper types such as non-white paper like newspaper or transparent originals. To adjust image density, select the following Density Levels from the drop-down list. |
Density |
Set the Density Levels. |
Scan Method |
Set the Scan Method.
|
Scan Size |
Set the originals size. |
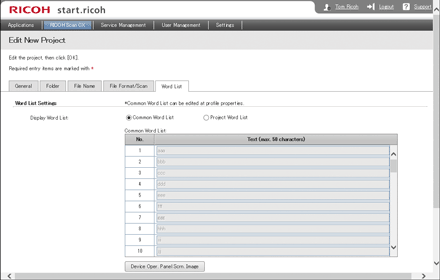
Word List tab
Item |
Contents |
|---|---|
Display Word List |
You can select the word list for the project.
|
Common Word List |
This appears if [Common Word List] is selected. You can check the registered words. You can edit this list on the profile properties screen. |
Project Word List |
This appears if [Project Word List] is selected. Set the words to be registered to the Word List. Up to 50 characters can be used for each word. The words which are set can be used for entering file names. Up to 60 words can be registered. A word consisting of only single-byte spaces cannot be registered. The following characters cannot be used: \ / : * ? " < > | |
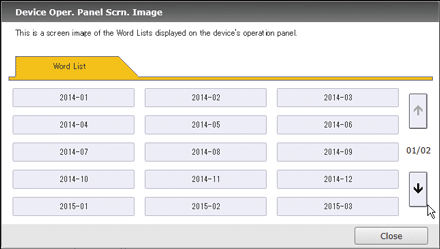
Device Oper. Panel Scrn. Image |
You can check how the Word List is displayed on the machine's control panel. Pressing [
|
Creating a Project
![]() Select the group where you want to create a project, and then click [New Project].
Select the group where you want to create a project, and then click [New Project].
The [Edit New Project] screen appears.
![]() Configure the settings as necessary, and then click [OK].
Configure the settings as necessary, and then click [OK].
The created project is displayed on the machine as follows:
Editing a Project
![]() Select the check box of the project you want to edit, and then click [Edit].
Select the check box of the project you want to edit, and then click [Edit].
If it is currently set to the [Display Device Operation Panel] display format, click the project, and then click [Edit Project].
The [Edit Project] screen appears.
![]() Edit the project, and then click [OK].
Edit the project, and then click [OK].
Copying a Project
![]() Select the check box of the project you want to copy and then click [Copy].
Select the check box of the project you want to copy and then click [Copy].
If it is currently set to the [Display Device Operation Panel] display format, click the project, and then click [Copy Project].
The confirmation screen appears.
![]() Click [OK].
Click [OK].
Deleting a Project
![]() Select the check box of the project you want to edit, and then click [Delete].
Select the check box of the project you want to edit, and then click [Delete].
If it is currently set to the [Display Device Operation Panel] display format, click the project, and then click [Delete Project].
The confirmation screen appears.
![]() Click [OK].
Click [OK].
Changing the Order of Displayed Projects
![]() Click [
Click [![]() ] or [
] or [![]() ] for the displayed project whose order you want to change.
] for the displayed project whose order you want to change.
If it is currently set to the [Display Device Operation Panel] display format, click the project, and then click [Display Order: Fwd.] or [Display Order: Back].
![]()
It takes up to an hour to apply the specified settings to the machine. To apply the settings immediately, carry out one of the following:
Execute [Update] in [Profile Management] in Administration Tool.
In the project selection menu on the machine's control panel, press [Update].
Reboot the machine.